Maybe you had the thought “Would solar power work for me?” the last time you went camping and were sick of hearing the generator grumbling in the background. Or when you glanced out at your shed and wished it had electricity so you could finally turn it into a she-shed or man-cave.
Then you started thinking how much it would cost to have a professional come in to install the panels and how big the panels must be and so on. And you almost decided to forget about solar power altogether until you realized -
“Maybe I can do it myself.”
At Lion Energy we had a similar thought - what if solar energy could be more affordable, portable, and simple? So we came up with the perfect DIY Solar Power Kit for people just like you who want sustainable, portable energy without any hassle. And now, with the help of this how-to guide, you’ll have your best alternative energy solution up and running in no time.
What Solar Power Can Do for You
If you’re not sure if solar power is the best option for you, remember this - solar power is a solution for everyone. And no, we aren’t exaggerating.
Honestly, with the versatility and portability of solar panels now on the market, you can use solar power in all sorts of ways. For example, for:
- Refrigeration
- Camping
- Outdoor Lighting
- Tailgating
- TV Bingeing
- Temperature Control
- Roadtripping
Even better, you can do all of these things (and more, this isn’t a comprehensive list) without causing damage to the environment. No more gas generators, no more noise pollution - just quiet, powerful energy.
And with our DIY solar power kit, it doesn’t matter much if you have limited sunlight in a day. The kit includes a battery that’s charged by the solar panel, so any sunlight that the panel has will charge the battery instead of going directly to your appliances. As long as the battery can charge, you’ll have power for hours at a time, even without constant sunlight.
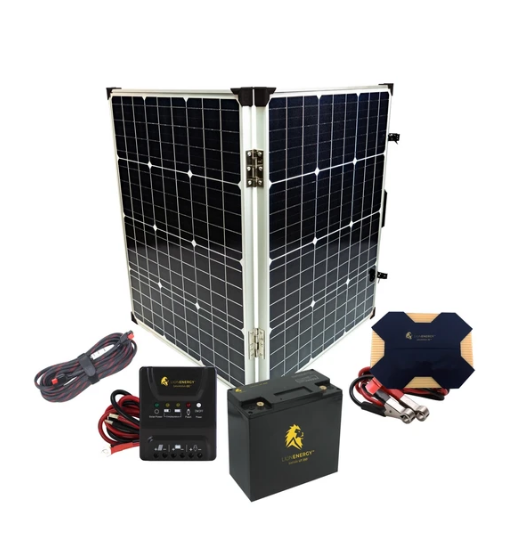
What Your Beginner DIY Solar Power Kit Includes
Your DIY Solar Power Kit includes five essential items to help you have power anywhere you go. Here’s a quick rundown of each item:
Lion 100 Solar Panel
First up, there’s the Lion 100 Solar Panel. This panel folds up and has a handle on the side to make it easy to carry on the go. You’ll have two options for setting up the solar panel - mount it with screws or extend its legs to help it stand up.
This panel is not only portable, but it’s also durable and is made to last for 20 years. That makes for long-lasting clean and reliable energy for decades at a time. And if one’s not enough for you, you can easily link panels together to give yourself more power from the sun.
Safari UT 250 Lithium Battery
The Safari UT 250 is a safe Lithium battery that completely replaces lead-acid batteries. It gives you more energy than you’d get with typical lead acid batteries, and it’s made to last you years. And you don’t need to worry about portability. It weighs only five pounds and is easy to carry, store, and use.
Savanna CC Charge Controller
The Savanna CC is a simple device that connects to your solar panel and to your battery. It controls how much energy passes from the solar panel to the battery and helps you know when your battery is charged and when it needs to charge.
Savanna IV Inverter
The Savanna IV is a power inverter. It receives the energy from your battery to power your devices and appliances. The outlet options include 2 AC outlets and 4 USB ports. It outputs up to 400W at a time, enough to power cell phones, TVs, computers, lights and a whole lot more.
25’ Anderson™ Extension Cable
The Anderson™ Extension Cable connects your solar panel to the Savanna CC, allowing you to keep your panel in the sun and the Savanna CC in the shade. It gives you 25 feet of space so you can move your solar panel into the optimal positions. This cord makes it easy to use your DIY Solar Power Kit almost anywhere.
Now that you know what’s in the Beginner DIY Solar Power Kit, let’s look at what’s really important - how to set up the kit so you can have all the solar power you need.
6 Simple Steps to Set Up Your DIY Solar Power Kit
1. Choose the Right Spot
When you go to set up your DIY Solar Power Kit, make sure you choose a spot that has a lot of sunshine throughout the day. The more sun you have, the better your power. If you need to, keep an eye on your yard throughout the day to see where some of the best spots might be for your solar panel.
If you’re camping, do the same thing. However, depending on tree cover, you may need to shift your solar panel around your campsite periodically during the day so it can have optimal sunlight all day.
2. Mount Your Lion 100 Solar Panel
Once you’ve chosen the right spot for your solar panel set up, place the Lion 100 Solar Panel either by mounting it or on the ground using the Lion 100 legs.
You can secure it to the roof of a shed, cabin or gazebo with screws. Once you’ve mounted the panel to the roof, make sure to drop the Anderson™ Extension Cable down to connect with the Savanna CC.
If you’re planning to move the panel frequently, however, don’t mount the solar panel with screws. You can simply pull out the legs on the back of the panel to prop up the solar panel wherever it needs to sit.
3. Mount Your Savanna CC (Charge Controller)
Choose a place for your Savanna CC. If you’re in a shed or cabin, mount it on the inside wall below the solar panel. You should have dropped the cord from the solar panel through the roof so you can connect the two with the 25’ Anderson™ Extension Cable.
If you aren’t using the DIY Solar Power Kit indoors, then simply make sure that the Savanna CC is within reach of both the Anderson™ Extension Cable and the Safari UT 250 battery. As the battery may need to be closer to the appliances or devices you will be powering, this may place the Savanna CC several feet away from the Lion 100 Solar Panel. That’s ok.
After placing the Savanna CC, connect it to the Anderson™ Extension Cable. The Savanna CC comes with a cable adapter that has one end connected to the Anderson Cable and the other end to the Savanna CC.
4. Connect to the Safari UT 250 Battery
Now that the Savanna CC is connected to the solar panel with the Anderson™ Extension Cable, place the Safari UT 250 battery near the Savanna CC. The Savanna CC has a red cord and a black cord to connect to the Safari UT 250 battery.
Remove the fly nuts from the Safari UT 250 battery terminals. Connect the red cord to the + battery terminal and the black cord to the - battery terminal and twist the fly nuts back onto the battery terminals (red to red and black to black).
5. Attach the Gator Clips
The Savanna IV Power Inverter should have two alligator clips with it, one red and one black. Attach these cords to the back of the power inverter with the red cord attached to the red terminal and the black cord to the black terminal using the eyelet end.
Then take both gator clips and attach to the Safari UT battery terminals. Again, attach the red gator clip to the + battery terminal and the black gator clip to the - battery terminal.
At this point, power should flow from the Lion 100 solar panel all the way through to the Savanna IV Power Inverter. You just need to flip the switch on the Savanna IV (turn it to the “on” position).
6. Mount the Savanna IV Power Inverter
Now place the Savanna IV Power Inverter. It will likely need to stay near the Safari UT 250, so mount it on the wall nearby or simply set it near the battery. Remember, wherever you place the Savanna IV Power Inverter, it needs to be within your reach as well as the battery’s reach.
Once you’ve placed the power inverter, you can plug in your devices and appliances to use your DIY Solar Power Kit.
DIY with Lion Energy
At Lion Energy, we believe that portable, affordable, and sustainable power should be easily accessible to everyone. We’ve done our best to create and provide the best solar energy products on the market. With the simple Beginner DIY Solar Power Kit, you don’t need to put off switching to solar any longer. So don’t wait. Buy the whole solar power kit today!
Share:
The Best Portable Power Units for 2020
The Best Portable Power Supply Kit for Parents On-The-Go